Sunday, February 27, 2011

Photographer Interview: Break into Concert Photography


Cuba Gallery: Summer / bee / white flowers / blue background / nature / colorful / photography by ►CubaGallery


Photo Credit: celtics baby clothes


Anthony Siciliano of Ramsey, NJ, was initially attracted to photography through some playful competition with his friends. Even when he realized his friends had no idea how to use their cameras, he stuck with it and earned recognition in photography and videography.

As a photojournalist and concert photographer his experience is transferring into his newest venture as part of Awesome Farm - a video production and photography business formed with his friends. At least with the friends that know how to use a camera.

Siciliano answered a few questions and gave some advice for fellow photographers looking to break in to photography, specifically concert photography and photojournalism.

What was your first camera?
My first DSLR was a Nikon D80 with the 18-70 mm lens. However, the first point-and-shoot that I bought for myself was a Pentax Optio S-40, which I still have. I really enjoyed taking pictures of flowers, but I was dissatisfied with the performance and results of my point-and-shoot (particularly, the shutter lag). I looked into DSLRs, and ended up purchasing the D80. Thousands of dollars, and much gear later, here I am.

What photographers - well known or unknown - inspire you?
I really have fun with concert photography, live shows where I bring back photos that give you a good sense of what happened during an event. A photographer that does this very well is Todd Owyoung. His website is http://ishootshows.com/. Not only does he get awesome results, but also he shares his wealth of knowledge with everyone, which I respect immensely.

Check out the Strobist blog as well. It features off-camera lighting and lots of DIY equipment at http://strobist.blogspot.com/.

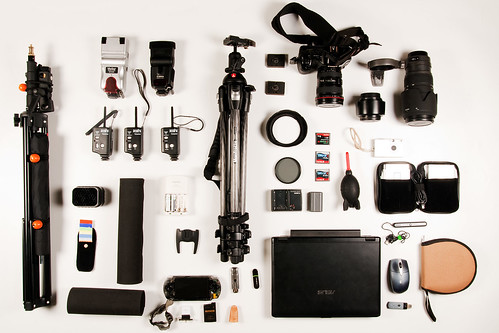
Is there a certain piece of gear you could not live without?
I do not skimp on my gear, and it has definitely paid off. In my opinion, it is better to save up for a longer time and get better equipment, than it is to spend early on something else. Unfortunately, I am addicted to buying new things, which can get very expensive. I could not live without any of this stuff, but if I had to pick one lens, the one that does most of my work is the 18-70mm lens.

Do you have any goals in mind with your photography?
I hope that I will be shooting famous bands very soon. A lot of doing that is getting to know the people who run the events, and the people who manage the bands. So far, the most famous people I have photographed in concert are Kate Voegele, Jack's Mannequin and the rest have been local bands. Currently, I shoot for local newspapers. The pay is not very good, but it is fun and better than nothing at all. Doing this will help me get exposure.

What advice would you give to someone who wants to shoot concerts?
The gear that is best for concert photography, at least in my opinion, is fast lenses and cameras with high ISO abilities. It is deceptively dark inside most music venues. My 50 mm lens does a lot of work there, with its extremely fast 1.8 aperture. My other lenses that go down to aperture 2.8 are extremely important. Large wide-open apertures are important for catching performers in action, without blur. Someone that wants to shoot concerts should definitely invest in a 50 mm lens, and save up to buy other fast lenses. Many places do not allow flash during performances, and your brand-new flash unit will not do any good when security tackles you. Also, watch out for drunken people and mosh pits at shows, which is a good way to wreck your camera.

How did you get a job with your local newspaper? What skills does that require?
When I was doing physical therapy for my tendinitis, I met a photographer who was shooting some photos for a brochure. We got to talking, and she gave me the contact info of a local photo editor. The skill involved in photojournalism is the same most other photographers use, except more irritating. Not only do you have to capture good pictures, but also you have to do it consistently, and make sure you get people's first and last names. If you do not get their names, editors will not use your photos. That can be a big disappointment, after all your hard work. You also have to be versatile and ready for anything. Get to events early and scope things out. that is the best advice I can give. Coming in late and not getting a good spot makes things a lot more difficult.

What advice would you give new photographers?
The best way to learn photography is by doing. When I bought my camera, I barely knew how to use the thing. One great thing I think everyone should do is a Project 365. That is where you take one photo per day (at least) and write a little bit about it on your Flickr account or a photo blog. It will help you learn to shoot in all current situations as well as on days or times where you think a camera might not be convenient to have. Then, at the end of the year, you look back and see how much you have improved, as well as your year in a series of photos. Also, do not forget to take a break when you are post-processing your images. I got a bad case of tendinitis from using the computer too much, and it really puts a kink in your photography.

Where can people see your photography?
Check out my photography on my Flickr site at: http://www.flickr.com/photos/scis/ and soon at www.awesomefarm.com.

Using Depth of Field for Photography


Some Photography Books, Yesterday by Arty Smokes (deaf mute)


photo source


It's one of the greatest tools available to photographers, it's easy to use, and yet it's among the least known and used abilities of a camera today. Pro photographers have used it for decades, but the amateur can use these same techniques without paying the professional price. It's called depth of field, and it's accessed through the use of the aperture.

The aperture, simply put, is the hole that light comes through in your camera. Light passes through the front of the lens, through a series of glass pieces, through a hole at the back of the lens, and into the camera. The aperture is the hole in the back of the lens, and you get to control this vital part of the camera, if you decide to want to bump up your pictures. You can place the camera on auto, and the camera will adjust its aperture, shutter and more to the situation it sees. By placing the camera in more manual modes, you take on powerful and personal control, and YOU get to decide what you want to create with your photographs.

An important factor here is lighting. Any photography relies heavily on the lighting that you are using, whether it be from the natural, ambient light around you, or artificial light, like a strobe or other flash unit. Especially while using natural light, it will be important to use a tripod to keep the camera steady while shooting. If you are shooting on a cloudy day, without much light, then the camera must compensate for less light by having a longer shutter speed, which it will do automatically in the mode I'll be explaining in a moment. A longer shutter speed means the camera won't be able to have a clearly focused picture without the use of the tripod.

Depth of field simply means the area of focus, or the area in the picture that is in focus might be a more accurate term. Photography is a two dimensional medium, having height and width, but it lacks depth, the third dimension. Your photography can create the illusion of that depth through a few easy camera settings. You may be asking yourself, why would I want to create the illusion of depth, and what is it good for? Part of the reason is to create a sense of emphasis. When you take a picture of a large area, with trees, birds, squirrels, people, rocks, etc, what is the thing or object that you are zeroing in on? Is there anything that you really want to emphasize to your viewer? If so, it's probably getting lost in the crowd of other things on the scene. The squirrels are so small you can barely see them, the people are walking their dogs, and the trees are swaying in the breeze. But what if you wanted to focus on the viewer on the flowers in the garden? When you create emphasis on an object, it strengthens your photo, and actually guides the eye of the viewer to that object. You could take pictures to create a story about that, as you can read in my article about photo stories. When you get in to take close-ups of the flowers is where the possibilities of great photography begin.

Emphasize the garden by focusing in on one or two flowers at a time. Grab a tripod, get down to eye level with them, and then get ready. Place your camera in a mode that allows you to change your aperture; the mode is usually called "A", or "AV" on some models. Film cameras can allow these changes too, on SLR models. They require you to simply change the f-stop manually on the aperture ring. On your digital camera, use your selector buttons to change your aperture. You'll see on your digital camera, most likely, a letter f, with the number on the readout on either the monitor, or the info panel on the top of the camera, or perhaps both areas. The f means f-stop, which is the name commonly used to describe the number of the aperture setting. The best way to emphasize a flower is to have only that flower in focus, and to have the rest out of focus. Change your aperture to a really low number, such as 2.8, 4, or 5.6. When the lens is at a low number like this, the lens hole is wide open, but it is creating a small area or depth of field; basically an inch or two will be in focus. Focus your camera, and shoot. Now, look at the camera, and look at your pictures. The one or two flowers should be in focus, but do you see how the background is fuzzy and out of focus? This is what is called a "shallow depth of field", and that comes from using a small number f-stop. That's because you've taken control of your camera, and changed the outcome! Because only the flower is in focus, and the rest is blurred out, you have guided your viewer to what YOU want to emphasize! You have used one of the most powerful tools available for a photographer to bring a new focus to your pictures. Try this with a lot of different scenes; look how the item is forced to really stand out for you because it's the only thing in focus.

Now, on the opposite end of the spectrum are the pictures that have the entire photograph in focus; such as a lighthouse standing out from the beach, with horseshoe crab shells in the immediate foreground. This is also done by changing the depth of field of your camera. Here, you again change your aperture, but this time place it on a high number like 16, 22, 28, etc. This is to create a large depth of field by using a small hole in the back of the lens. Again, you must use a tripod to keep the camera steady. Take a picture with something in the near foreground, such as a rock or the crab shells, and then compose your picture with a mountain or some other object some distance away, focus, and shoot. Remember to use the rule of thirds here for additional emphasis. As you'll see, both areas should be in focus, again showing the third dimension and creating the illusion of depth. This is a large depth of field.

It's a little known tool in the photographer's toolbox, but almost any camera made in the past four years will have some sort of ability to work with depth of field, whether they have a point and shoot or DSLR. Every photographer, of every level, has the ability, through practice, to create beautiful photographs that can rival those of the pros, by using the tools available with every camera. Use the strength of depth of field when you create the third dimension in your photographs, and add a new and incredibly
powerful personal dimension to your photography.

Saturday, February 26, 2011

Photography Tips and Tricks


Photography in a Rucksack by Daily Travel Photos .::. Pius Lee


source,credit


Photography isn't just about making memories, it's about art. Be artistic. Here are a few tips and tricks to help you make those photos, picture perfect.

To make those dull photos turn into works of art, consider these questions:
Decide if you want the full subject, half, or even a close up. How much background do you want, or even foreground? Exactly how close do you want that close up? What details do you want to focus on? Do you want a vertical, horizontal, or tilted photograph? What angle do you want? What's the best lighting? What background do you want to use?

1. Placing the subject of interest. Choose how much of the subject you want photographed. (Example: you want full body, half body, or face shot.) If your subject fills the frame then it's okay to center it. If you are trying to get more of the background, try placing your subject to the right or left in the viewfinder. With a horizontal (laying down), try to place them at the top for more foreground, or at the bottom for more background. And you could even tilt the camera for a more funky picture. It all depends on what part of the scenery you want visible in the picture. Maybe you want that tree to your left and your subject to the right. Or the patch of flowers in front and the mountains in back. (I find it best to take my time and take shots of each possible way and several different poses. This way I know I'll find the best photograph with the most potential.)

2. Don't center. The circle, plus sign, or brackets in the middle of your viewfinder is for focusing and isn't necessarily for centering the subject. Placing your subject in t he circle could leave you with a lot of empty and useless space on your photograph. Too much background and not enough subject. If your subject fills the frame then it is okay to center them. (Sometimes you just have to ignore the focus points and concentrate on your subjects placement in the frame instead.)

3. Camera angles. Walk around the subject, shoot from all angles and sides. This will help you to get the best lighting, background, and different aspects of the subject. You will want to find the best angle for all three. Pick a background that will not distract your viewers from the subject of interest. (I choose my backgrounds to where there's not much clutter. Sometimes I will use a plain sheet or blanket and place it behind the subject, but making sure it does not clash or blend.)

4. Reflectors. In some situations you just can't get enough light or you perhaps you just want more. To use a light reflector, place it in a position where it reflects light onto the subject without it getting in the frame. Use this if your shot is coming out too dark or there are too many shadows. On night shots that you need more than your flash can put out, place a lamp (or several) near your subject, but out of sight, and use the light reflectors to bounce from the lamps to where needed. (Some homemade light reflectors can be real cheap to make. You could use white cardboard, or if you can't find this, then simply take any piece and paint it white. For more light, place tin foil over your piece of cardboard, smooth it out, and reflect where needed.)

5. Shading. Using the same piece of cardboard as mentioned above, you can use this to block the light as well. You could make this easier by painting one side white and the other black. Or just place the piece in front of the lamp or sun to dismiss light from your subject. On most cameras you can use a sunshade for the lens, some cameras come with this, some you buy separate. This won't keep light from your subject, but it will block the light from causing a flare effect on the outcome of your photograph. The sunshade just clicks into place around your lens, and keeps the lens safe from any glaring.

6. Outside daylight. Direct sunlight is when you place the sun behind the camera, but in front of the subject. Using direct sunlight can cause shadows on the subjects face and possibly their eyes squinting. Back light is when the sun is behind the subject and in front of the camera. This will lighten the photo and cause much softer features on the subject.

7. Preventing red eye. Red eye is caused when the flash is too close to the lens. Ways to prevent this are: Attach a larger flash to your camera, t his way the flash is further from the lens. Or if buying a camera, look for one with the flash located far from the lens. Try getting closer to your subject when needing the flash. (Before I bought my camera with built in red eye correction, I had to use a photo editing program to correct these problems. I was even scanning my pictures and still having to edit when I was using my film camera that was hopeless against red eye.)

Where to Find Great Black and White Photography Online


Cuba Gallery: California / Los Angeles / city / Santa Monica / color / blue / circus / ferris wheel / amazing / sky / summer / background / clouds / fun / photography by ►CubaGallery


source


Black and white photography looks great in any décor. You can find just about anything, in any size, to match just about any room. Plus, the neutral tones of black and white photography ensure that it will match just about any color scheme. Here are some of the best places on the web to purchase black and white photography.

AllPoster.com

AllPoster.com is a fantastic site for cheap artwork. Now, cheap doesn't mean poor quality - quite the contrary, in fact. You can find just about anything - traditional paintings, classical art, black and white photography, large posters of bands, musicians, movies and more. They also offer framing.

My Top Pick: "City Street Signs" by Nelson Figueredo - $24.99 (Price doesn't include shipping and handling, or optional framing.)

Why I Chose This Piece: I love New York, more importantly - I love Broadway. Of course, Broadway and West 34th Street is practically the center of the theatre district. It's a great way to bring a little bit of Broadway right into my own home.

The Wall Art Store

This online store has a lot of fantastic, very 'artsy' black and white photos. They offer free shipping and all of the photos come framed, they even offer a few different selections for matting and frames. However, prices can run you from $55 dollars and all the way up to $919. Ouch. However, the quality is very high - so you can be sure you're getting your money's worth.

My Top Pick: "Stonehenge Sunrise" by Matthew De Haven - $50.00 (Price does not include shipping, handling or frame.
Why I Chose This Piece: I love Stonehenge, it's a fascinating place. The fog adds to the mystery of the structure and it's a great piece to add to a global photography collection.

Artful Home

This website offers a lot of wonderful photographs, but the prices run fairly average. The bottom line photographs start at $110 dollars and run up to several thousand dollars - so this isn't the most budget friendly site. However, if you've got the extra cash lying around, it's a great option and chances are you'll spend similar amounts at local art studios, especially if you live in a metropolitan area.

My Top Pick: "Winter Trees I" through Phoenix Galleries - $299.00 (price includes free shipping as well as framing and matting.)

Why I Chose This Piece: This particular photograph would be great for my fiancé's office. He loves the look of trees in the winter, so this is a great piece for him.

AbsoluteArts.com

Absolute Arts caters to the United States, the UK, China and more - and their prices range anywhere from $10 to $1,000,000. With more than 2500 works of art, you'll be sure to find exactly what you're looking for with this website.

My Top Pick: "Merced River Ice" by Ron Gallmeier - $330, Small; $665, Medium; and $1000, Large.
Why I Chose This Piece: Again, this is another piece I know my fiancé would really appreciate. Plus, I love the look of the water, the snow and the trees - so it's something we would both really enjoy in any room of our home.

So whether you've got $10 or $10,000 - you'll be sure to find the ideal pieces of black and white photography to fit your home décor and personal tastes.